Do you want to fill your kitchen with the delightful aroma of fresh rosemary? Not only can you enjoy its fragrant scent all year long, but with just a few simple steps, you can propagate rosemary plants from cuttings—freeing you from the need to buy new plants. This guide will show you how to take healthy rosemary cuttings, root them, and grow fresh, vibrant plants for your home.
Why Grow Rosemary from Cuttings?
Growing rosemary from stem cuttings is a rewarding and cost-effective way to expand your herb garden. Unlike starting from seeds, which can be slow and less reliable, rosemary cuttings allow you to create new plants that are genetically identical to the mother plant. Here are a few reasons why propagation by cuttings is so beneficial:
- Faster Growth: Rosemary seeds have low germination rates and take time to sprout. Cuttings, on the other hand, are already established and will mature faster, giving you more rosemary to enjoy sooner.
- Clone of the Mother Plant: The rosemary plant you propagate from cuttings will be an exact replica of the original, preserving its flavor, aroma, and resilience.
- Free Plants: A single rosemary plant can provide multiple cuttings, allowing you to grow several new plants without spending a dime.
- Gift Potential: Fresh rosemary plants make great gifts. You can share your bounty with friends and family, spreading the joy of homegrown herbs.

Step-by-Step Guide: How to Propagate Rosemary from Cuttings
Step 1: Choose the Right Cutting
Start by selecting healthy, green shoots from your mature rosemary plant. Avoid using woody or brown stems, as they are less likely to root successfully. Fresh, young growth is ideal for propagation.
Step 2: Take the Cuttings
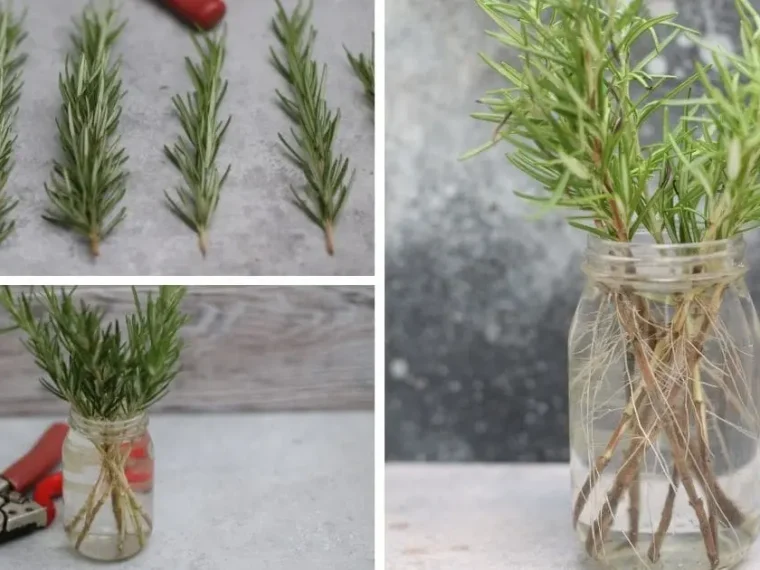
Using sharp, clean scissors or pruning shears, cut 4-6 inch stems from the rosemary plant. Ensure that each cutting has at least one set of leaves, and try to cut just below a node (where the leaves meet the stem). Place the cuttings in a container of water, making sure that the stems are fully submerged.
Step 3: Prepare the Cuttings
Remove the leaves from the bottom 2 inches of the cutting to expose the stem. This helps prevent the leaves from rotting underwater and encourages the growth of new roots.
Step 4: Rooting the Cuttings
Place the cuttings in a jar or glass of water, ensuring the bottom of the stem is submerged. Put the jar in a warm, sunny location but out of direct sunlight. Change the water every 2-3 days to keep it fresh and encourage oxygen flow, which prevents decay.
In about 3-4 weeks, you should start to see roots forming on your rosemary cuttings. If the weather is cooler, it may take a bit longer. If any cuttings turn brown or lose their needles, discard them and try again with fresh cuttings.
Step 5: Potting the Cuttings
Once your cuttings have developed roots that are about ½ inch long (typically after 4-6 weeks), it’s time to pot them up. Use a well-draining, sandy potting mix—cactus or succulent soil is a great choice.
Fill a small pot (about 4 inches in diameter) with slightly damp soil, then make small holes using a pencil or stick. Gently place each rooted cutting into the hole, ensuring the roots are fully covered, but avoid damaging them. Water the cuttings thoroughly, but don’t soak them. Let the soil dry out between waterings to avoid root rot.
Caring for Your Rosemary Plants
Once your rosemary plants are established, they require minimal care, but attention to their growing conditions will ensure they thrive.
- Light: Rosemary loves sunlight. Aim for at least 6-8 hours of direct light per day. If growing indoors, place your plants near a south-facing window. Alternatively, you can use grow lights during the winter months when natural sunlight is limited.
- Watering: Rosemary is drought-tolerant but needs regular watering to stay healthy. Allow the top inch of soil to dry out before watering again. Be careful not to overwater, as rosemary is prone to root rot.
- Pruning: Prune rosemary regularly to encourage bushy growth. Cutting back the plant will not only make it more compact but will also help it produce more flavorful leaves.
- Re-potting: As your rosemary plant grows, its roots will need more space. If it outgrows its pot, transfer it to a larger container to prevent it from becoming root-bound.
Tips for Growing Rosemary Indoors During Winter
If you live in a colder climate or want to keep your rosemary indoors during winter, here are some tips to ensure it thrives:
- Quarantine: If you’re bringing a new rosemary plant into your home, isolate it for a few weeks to ensure it’s free of pests or diseases.
- Temperature: Rosemary prefers cooler temperatures during the winter months. Keep it away from heat sources such as radiators or wood stoves. The ideal temperature range is between 60-65°F (15-18°C).
- Humidity: Rosemary thrives in low-humidity environments, but indoor heating can dry out the air. Light misting with water or using a humidity tray can help your plant stay hydrated.
- Pests and Diseases: Common indoor pests that affect rosemary include aphids, red spider mites, and whiteflies. If you spot any, treat your plant with an organic insecticidal soap. Additionally, be wary of over-watering, which can lead to root rot or fungal issues.
Conclusion
Growing rosemary from cuttings is an easy, rewarding way to expand your garden, save money, and enjoy fresh herbs year-round. Whether you’re propagating rosemary for your own kitchen or sharing the love with friends and family, this versatile herb will delight you with its fragrance and flavor. With just a little patience and care, you’ll have an abundance of rosemary plants to enjoy!


