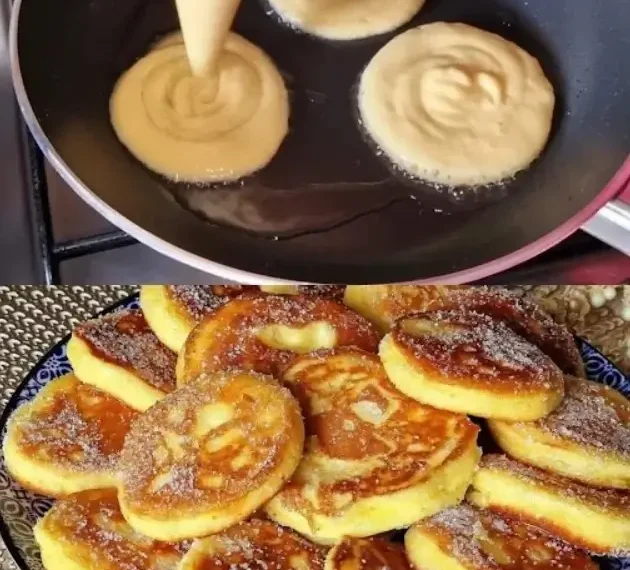
Mornings are meant to be savored, and there’s no better way to start the day than with a plate of fluffy, golden pancakes. Quick and Easy No-Oven Yogurt Pancakes are a lifesaver for those who crave a warm, homemade breakfast without the hassle of baking. These pancakes are not just easy to make but also versatile, light, and packed with flavor. With simple ingredients you likely already have in your kitchen, you can whip up these pancakes in no time. Perfect for busy weekdays or a relaxing weekend brunch, this recipe is sure to become a household favorite.
Let’s dive into the details to create the most delicious yogurt pancakes you’ve ever tasted!
Ingredients :
- 1 large egg (room temperature for easier mixing)
- 3 teaspoons of sugar (for just the right amount of sweetness)
- 8 grams of vanilla sugar (to add a delightful aroma)
- 2 teaspoons of vegetable or coconut oil (plus extra for cooking)
- 125 grams of yogurt (plain or Greek for a velvety texture)
- 80 milliliters of milk (adjust to achieve the desired batter consistency)
- 180 grams of all-purpose flour (or substitute with whole wheat flour for a healthier option)
- 10 grams of baking powder (for fluffy, airy pancakes)
- Caster sugar (optional, for dusting)
Instructions :
Step 1: Prepare the Batter
- Beat the Egg and Sugar
In a mixing bowl, crack the egg and whisk it with 3 teaspoons of sugar and 8 grams of vanilla sugar. Whisk until the mixture becomes foamy. This step incorporates air into the batter, which will help the pancakes rise beautifully. - Incorporate Wet Ingredients
Add 125 grams of yogurt, 80 milliliters of milk, and 2 teaspoons of oil to the bowl. Mix everything thoroughly using a spatula or whisk. The yogurt not only adds a subtle tangy flavor but also ensures the pancakes remain moist and tender. - Mix in Dry Ingredients
Sift 180 grams of flour and 10 grams of baking powder into the wet mixture. Sifting ensures the baking powder is evenly distributed and prevents lumps. Gently mix until the batter is smooth and lump-free. Be careful not to overmix; this will keep the pancakes light and fluffy.
Step 2: Cook the Pancakes
- Heat the Pan
Place a nonstick skillet or frying pan over medium heat and lightly coat it with oil. The pan should be hot enough that a drop of water sizzles upon contact. - Pour the Batter
Using a ladle or measuring cup, pour a small amount of batter onto the pan. The size of the pancake is up to you, but smaller pancakes cook faster and are easier to flip. - Watch for Bubbles
Let the pancake cook for 2-3 minutes, or until bubbles form on the surface and the edges begin to set. This is your cue to flip. - Flip and Finish
Gently flip the pancake using a spatula and cook for another 1-2 minutes until the other side turns golden brown. Repeat with the remaining batter, adding more oil to the pan as needed.
Step 3: Serve and Customize
- Presentation is Key
Stack the warm pancakes on a plate for a picture-perfect presentation. Dust them with caster sugar for an extra touch of sweetness and elegance. - Add Toppings
Personalize your pancakes with toppings like fresh fruits (sliced bananas, strawberries, or blueberries), a drizzle of honey or maple syrup, or a dollop of whipped cream. For an indulgent treat, try adding a spoonful of Nutella or peanut butter. - Get Creative with Flavors
Enhance the batter by folding in chocolate chips, chopped nuts, or a pinch of cinnamon. This simple twist takes your pancakes to the next level.
Extra Tips for Success
- Make-Ahead Batter
If you’re pressed for time, prepare the batter the night before. Cover it tightly and refrigerate. Give it a quick whisk before cooking to restore its consistency. - Storage and Reheating
- Refrigerator: Store leftover pancakes in an airtight container for up to two days. Reheat in a skillet or microwave for a quick breakfast.
- Freezer: To freeze, lay pancakes in a single layer on a baking sheet and freeze until firm. Transfer them to a freezer-safe bag or container and store for up to two months. Reheat in a toaster or microwave.
- Cooking for a Crowd
Keep cooked pancakes warm in a low oven (about 200°F or 90°C) while you finish cooking the rest of the batch. This ensures everyone can enjoy a hot meal together.
Conclusion :
Quick and Easy No-Oven Yogurt Pancakes are the ultimate solution for a hassle-free, delicious breakfast. Their light and fluffy texture, combined with the subtle tang of yogurt, makes them a hit for all ages. Whether you’re serving them plain, topped with fresh fruits, or drizzled with syrup, these pancakes are endlessly customizable to suit your taste.
With this simple recipe and a few helpful tips, you can effortlessly whip up a batch of pancakes that are perfect for any occasion. So, grab your ingredients, heat up your skillet, and enjoy the delightful process of making these crowd-pleasing pancakes. Breakfast has never been this satisfying or easy to prepare!


